Getting Started With Gesso
For creators: You might be an artist, content creator, history nerd, podcaster, author, tour guide, educational center or anyone with a story to tell.
We’ll take you through the entire process from registering to publishing. If you're looking for a specific topic, feel free to jump ahead by clicking on the titles below.
Creating and editing the route
Creating an account
If you are interested in registering as a creator, request access by sending our team an email.

Once logged in, you can add a profile image and creator bio to introduce yourself to listeners. This will be visible and associated with any content you publish.

After filling in your information, you're ready to begin creating your first tour.
Creating your first tour
When you create a tour, you will first need to give it a title. You can always make changes to the title later on.
Add the tour’s start point by clicking on the “add marker” icon on the upper right corner of the map. Click on the map wherever you would like the first audio file to play. This should serve as an exciting introduction to the tour and capture listeners’ attention.
Add additional markers by using the “add marker” icon to click on places on the map where you want additional audio files to play.
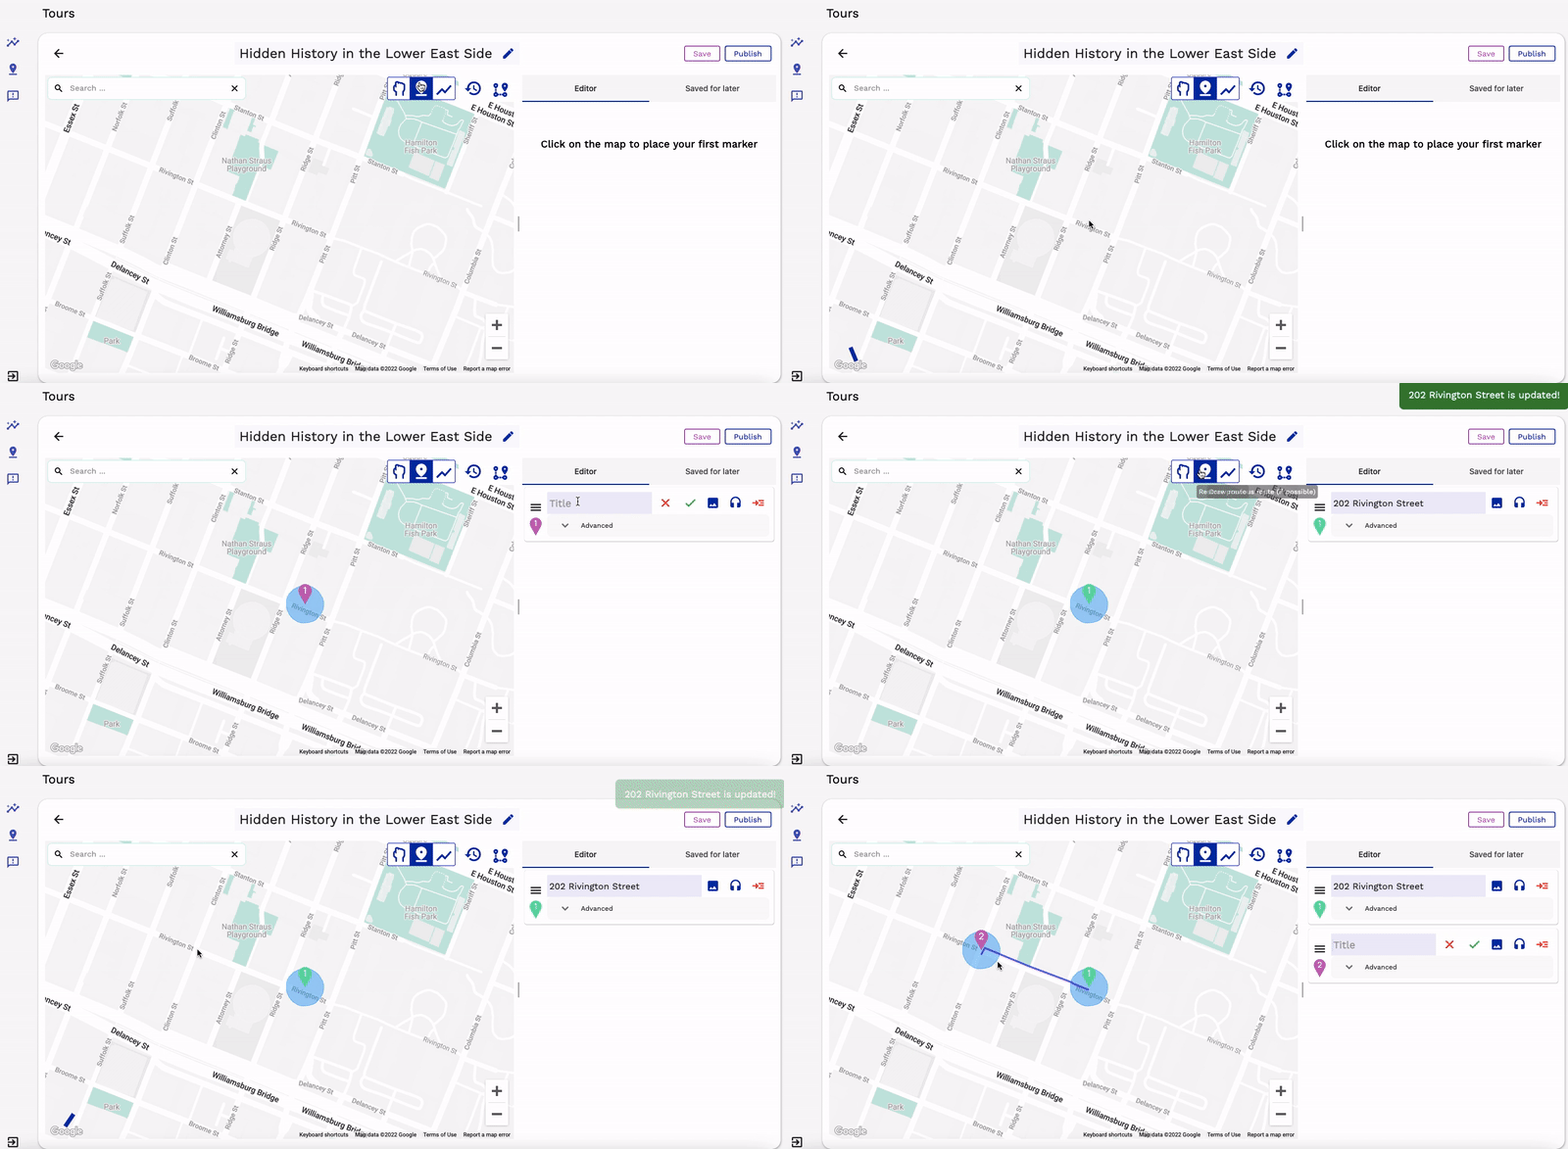
As you add markers, you will notice items get added to the editor located to the right of the map. By clicking on each item’s image icon and headphone icon, you can add images, audio files, and transcripts to each marker on your tour. Dimensions for photos should follow a 1.5:1 ratio, for example 1500 x 1000. Image files should be saved as JPG. Other files, including JPEG, won’t be uploaded properly. Audio files should be saved as MP3, and there is no limit on the image or audio file sizes.
In the editor, you will also notice an “advanced” option for each item. Feel free to leave this as is. If necessary, these advanced settings allow you to type in a specific address for each item, and you can change the default radius of 30 meters (~100 feet) to a different number. The radius represents how far away a listener is from a marker when the audio gets triggered and begins playing.
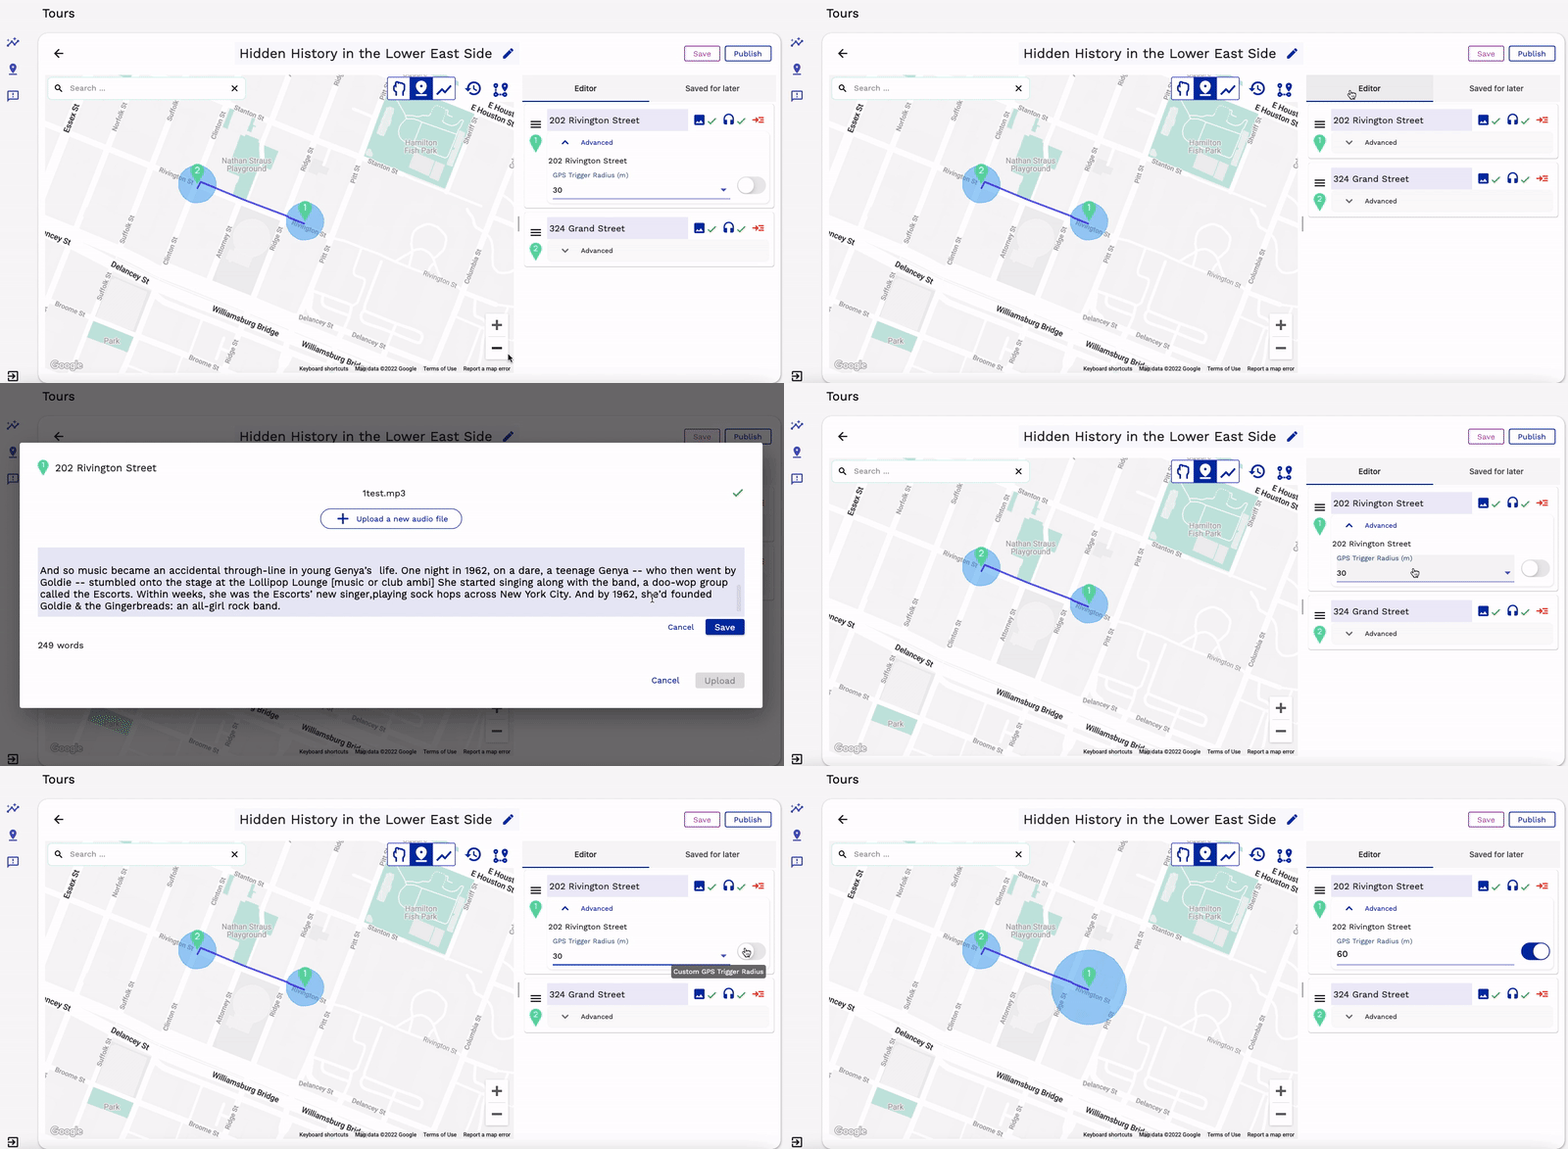
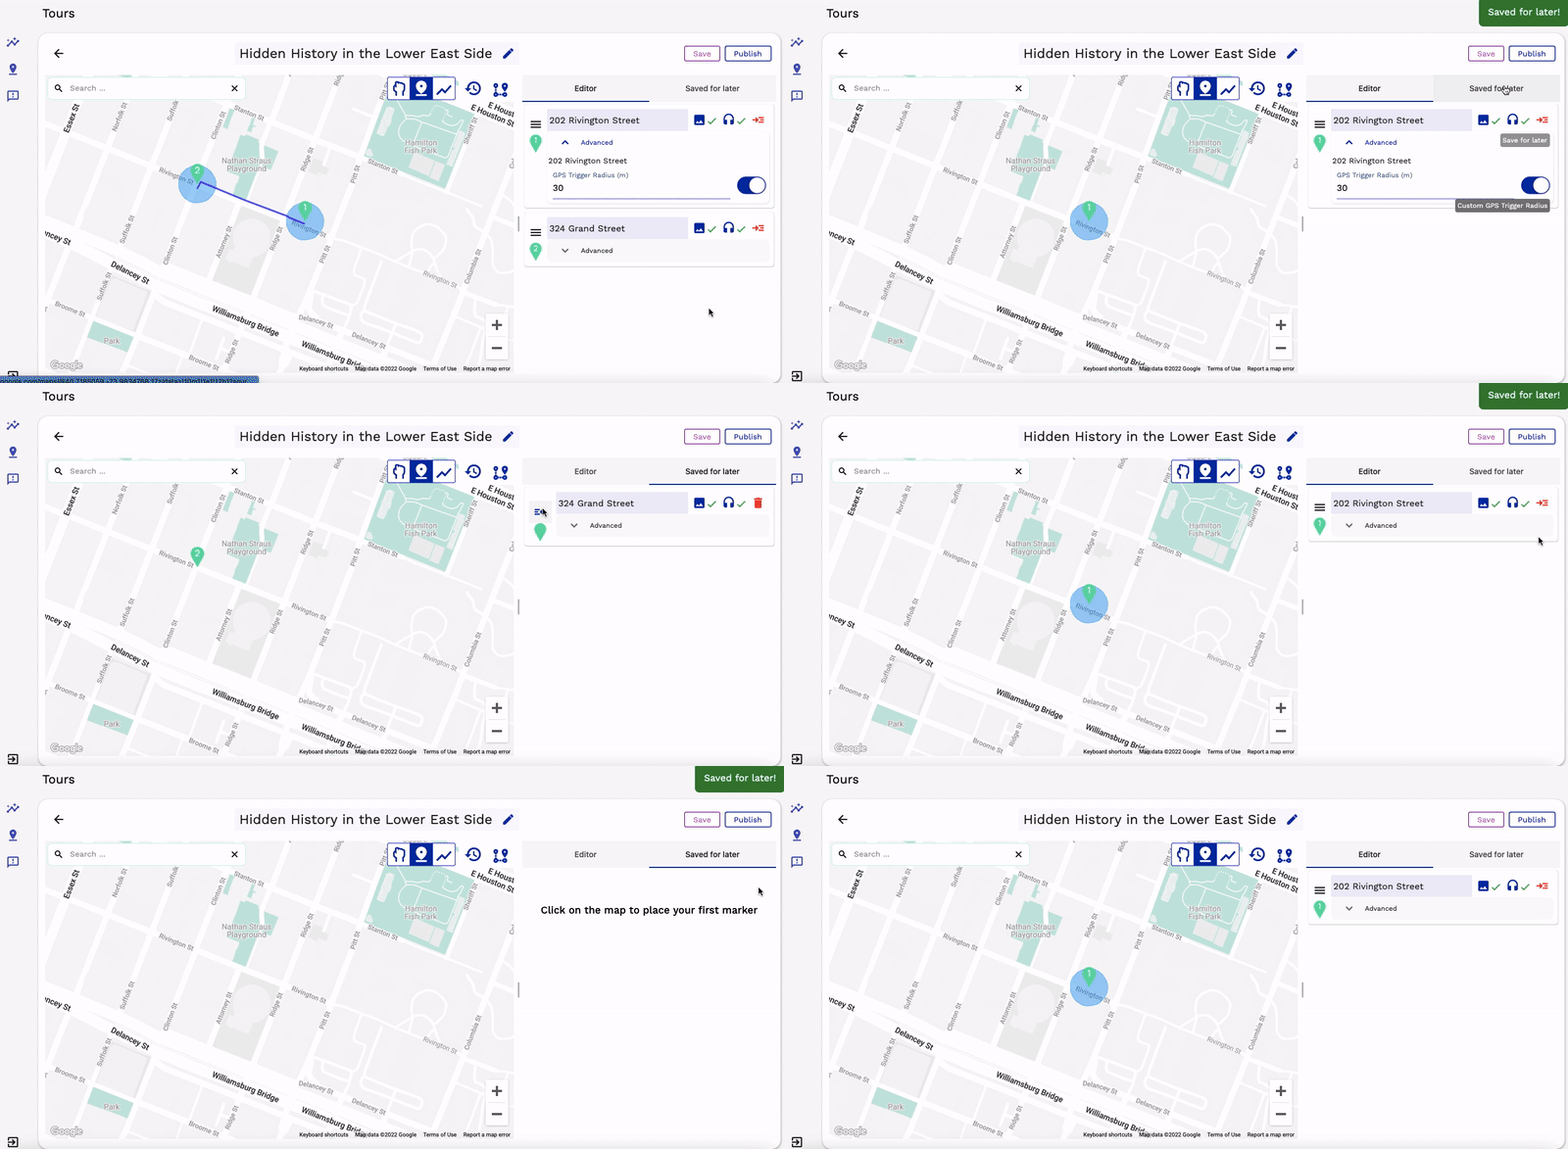
If you want to save an item for later and hide it from the map, click on the red “save for later” icon. As you're deciding which items you want to include in your tour, you can click on the “Saved for later” section which will show all of your hidden items. To re-add an item to the editor and have it show up on the map again, simply click on the “+ to Editor” icon.
To permanently delete an item, click on the red trash can icon when the item is in the “Saved for later” section.
Creating and editing the route
Creating a route connects all of your individual markers and gives listeners the ability to preview where they’ll be walking. You have two options to create your route. You can create your own custom route or you can put multiple markers on the map and auto-generate the route.
Option 1: To create your own custom route, click on the “draw route” icon on the upper right corner of the map. Next, click on the map where you have your first marker and continue to move your cursor and click on relevant streets that connect each marker. Click on the final dot to end the route. This creates a walkable path that shows listeners when to keep straight and when to turn.
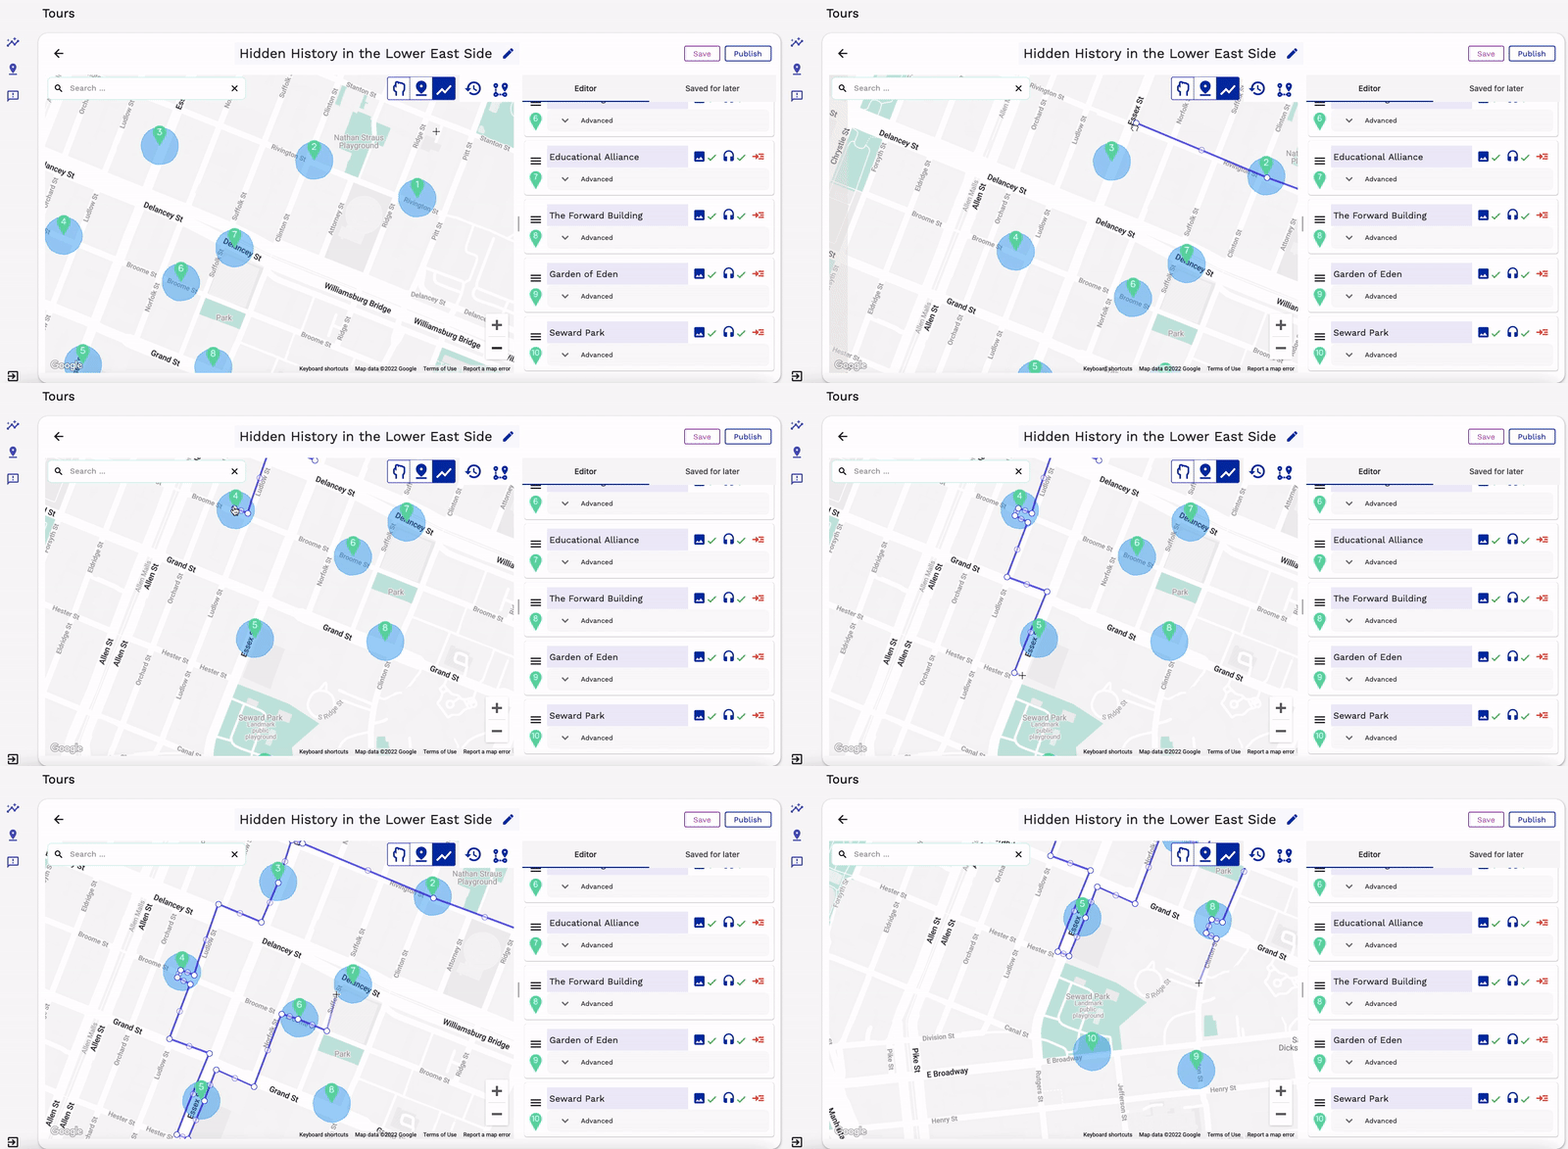
Option 2: To have your route auto-generated by Google Maps, click on the “Generate route using Google Maps” icon in the upper right corner of the map. You need at least two markers on the map in order to do this.
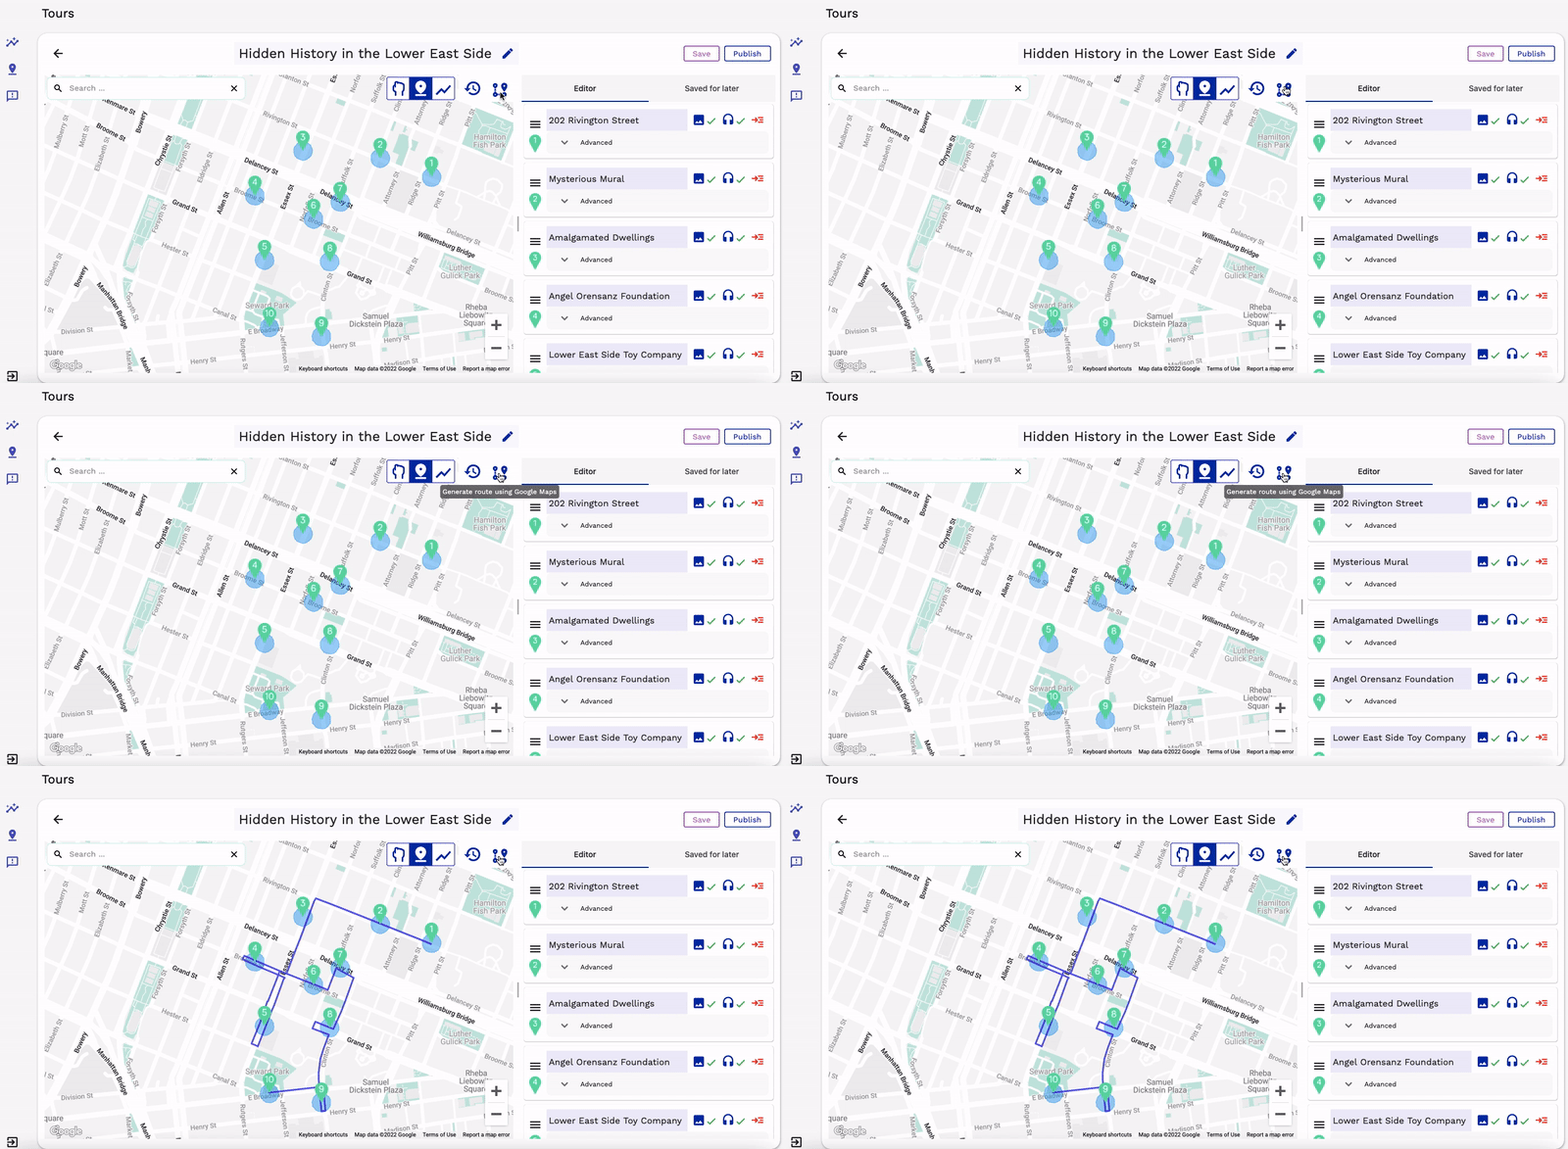
In both options, you might need to reorder markers and change the route. To reorder markers, simply drag and drop the markers to change their placements on the map.
After changing the placement of the markers, you’ll need to update the route. To edit the route, click on the hand icon in the upper right corner of the map. You will see small dots along the route, which you can click on and move to make changes.
If you are editing a route using Option 2, you can also click on the “Generate route using Google Maps” icon after moving a marker in order to update the route. Even when using this option, you can still make additional edits by moving around the small dots.
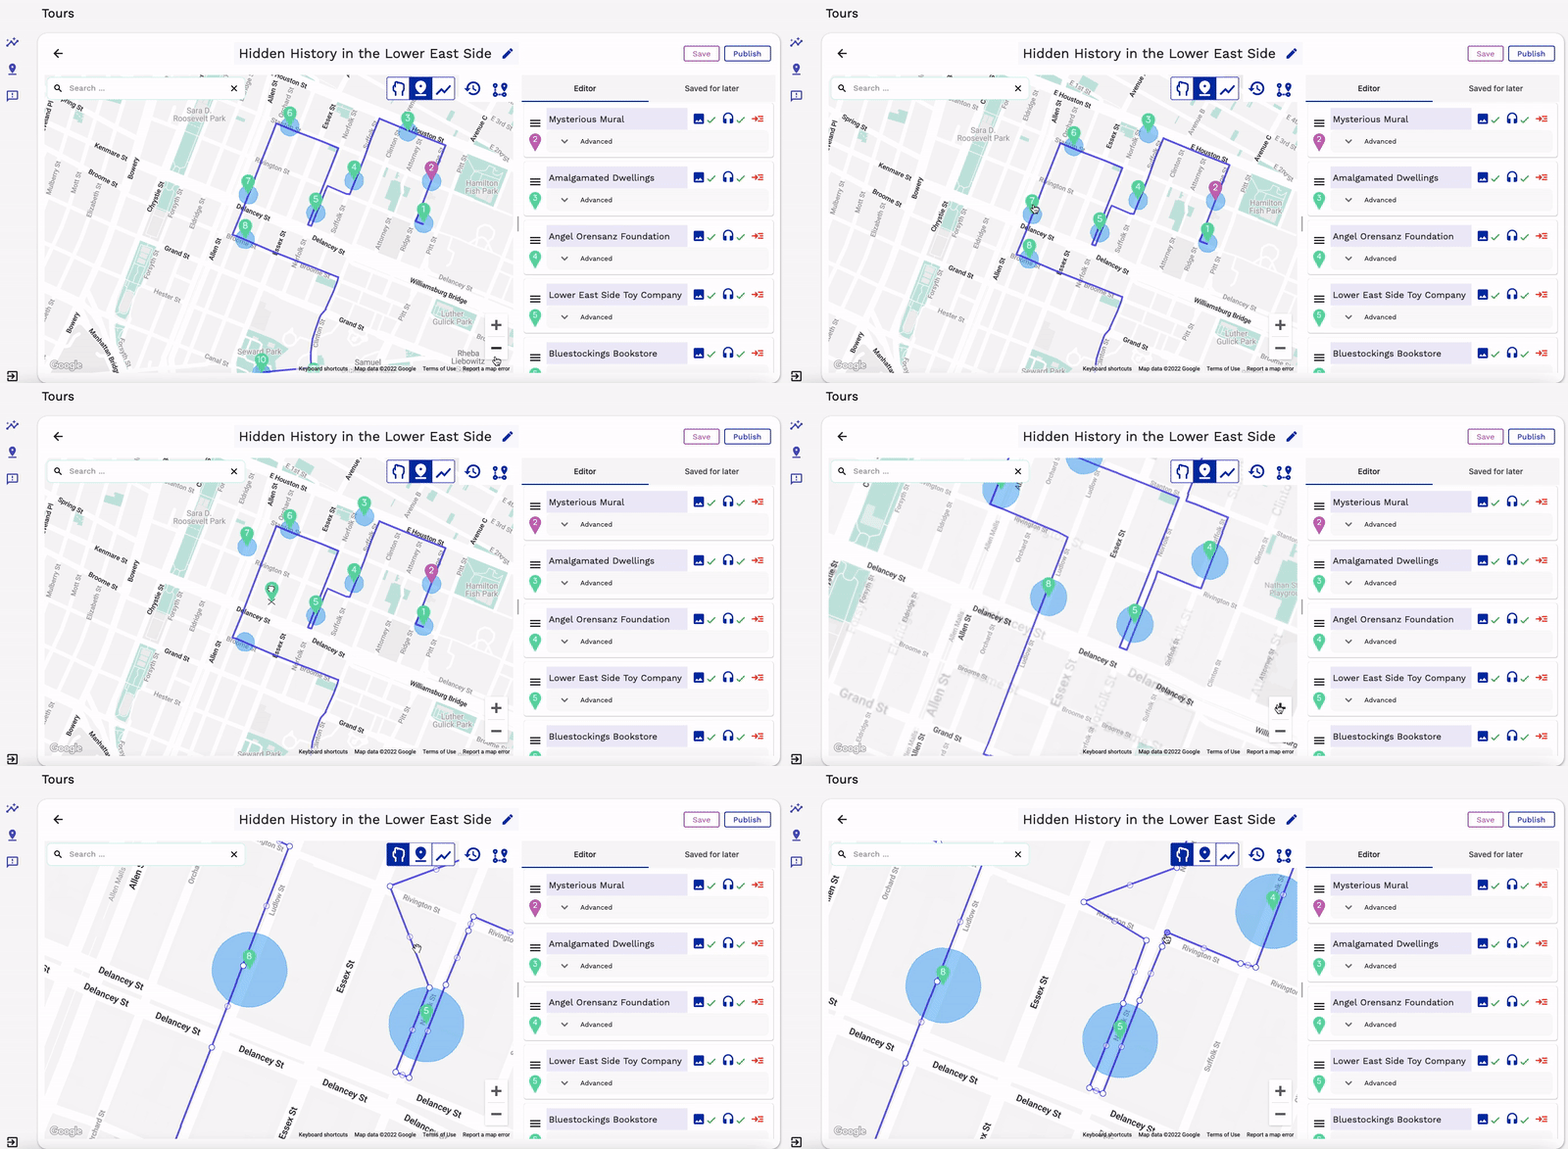
If you’d like to completely start again and redo the route from scratch, click on the hand icon and then switch back to the “draw route” icon. You will see a blank map which you can either make a new custom route or auto-generate one.
If you’d like to restore a previous route, click on the clock icon in the upper right corner of the map. If possible, previous routes will appear on the map each time you click that button.

Editing tour information
If you need to make edits to your tour information, click on the pencil icon to the right of the tour title. A window will pop up that allows you to make changes to the tour title, cover image, tour description, video trailer (optional), and the duration information.

The cover image should be a JPG file and should follow the same 1.5:1 ratio. If you choose to show a video trailer, please first upload your video to YouTube or Vimeo and then paste the share link here.
Testing the tour
As you're working on your tour, you'll probably want to test it a few times in the actual location to make sure your audio content matches the surroundings and that you're happy with the overall timing and route. Whenever you want to test your tour, click save on the upper right corner of the screen. A message will appear that gives you a passcode to use within the Gesso mobile app as well as a unique URL to use within your web browser.
Ready to publish
When you’re ready to share your tour with the world, go ahead and press publish! You will receive your unique URL that connects to Gesso’s web store, and you can share this with others as you promote your tour. Listeners can also search for your tour within the Gesso app.
If you are publishing a free tour, you don’t have to set up any further payment information. Gesso’s creator platform is free for you to use, and you can publish multiple free tours without any fees.
If you are publishing a paid tour, click on the back arrow icon that takes you to your dashboard.
To the right of the tour title, you will see a “Price” section. By default, the price is set to free. When you click on that box, you can change the tour’s price to $11.99 or $17.99. When you set a price, a message will appear that gives you additional instructions about how to set up your payment information and explains important information about any small fees that might be associated with your paid tour.
If you want to archive a tour, you can change the status to “Archived” in the dashboard.
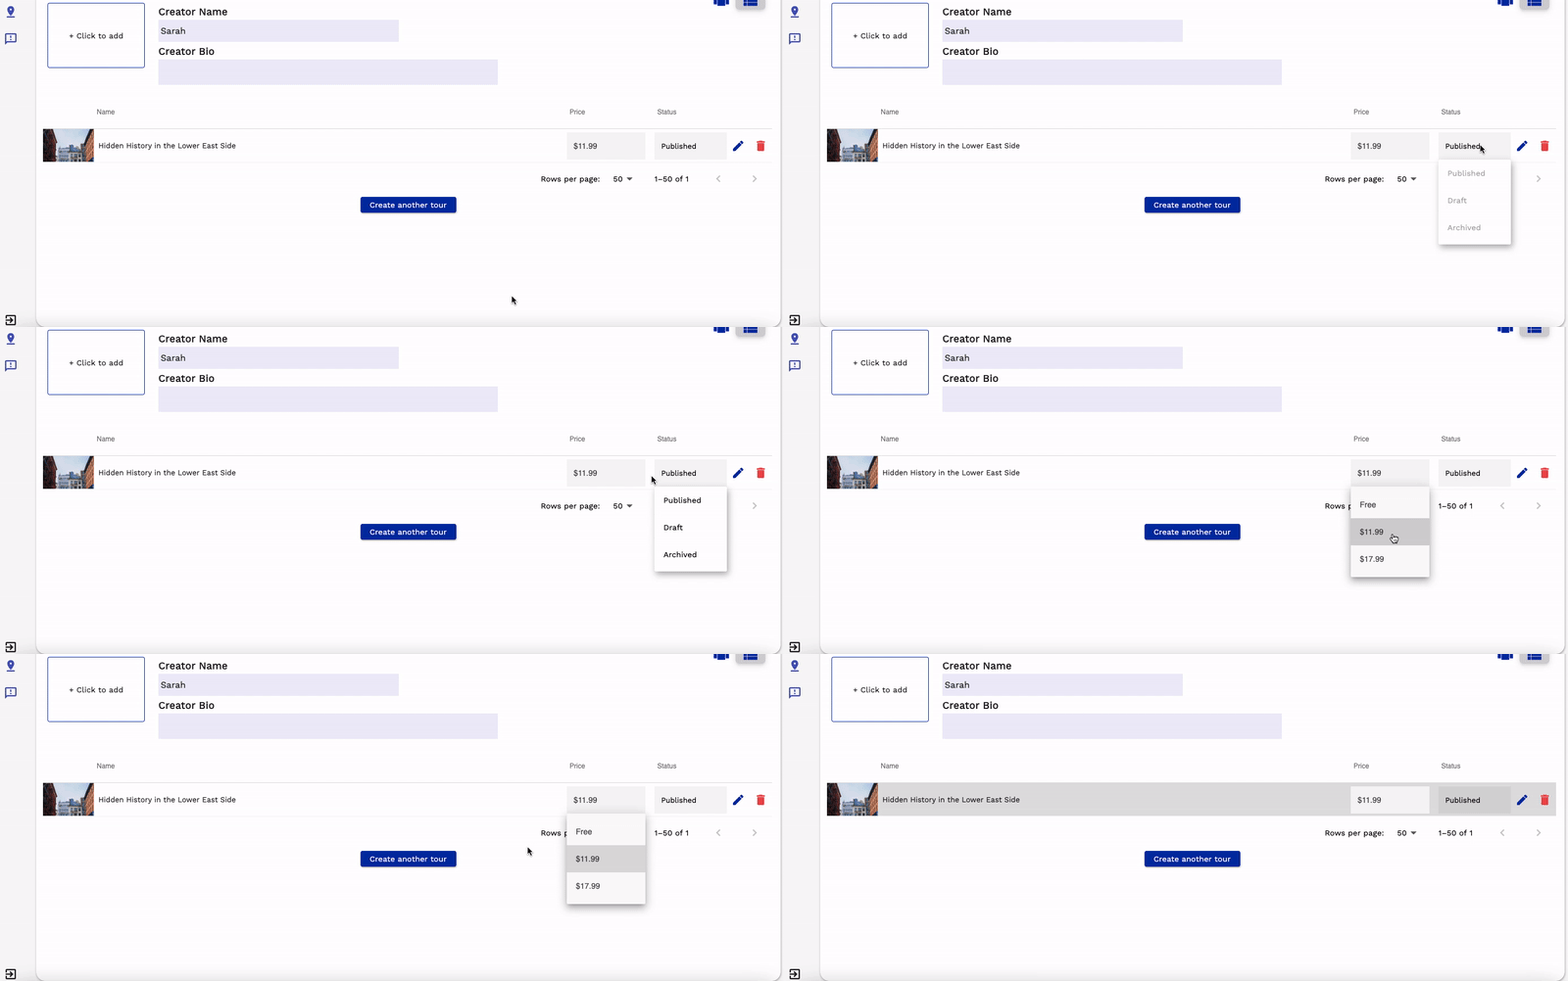
If you want to permanently delete a tour, you can click on the red trash can icon in the dashboard. This cannot be undone.
Gesso reserves the right to remove any content that violates our Terms of Service or our values.
Additional help
If you’re looking for advice and inspiration, check out examples from other creators who published audio tours for a street festival in Chicago, an outdoor opera in Harlem, a restaurant crawl in Queens, and an augmented reality concert in Upper Manhattan.
If you have additional questions, check out our FAQ page.